A while ago my husband brought me from the skip beautiful (and almost new) wooden boards… I must admit he hasn’t done it completely from his own will, I might have bribed him but what matters is the fact I have now new backgrounds for photography (!)
Previously I have posted about wooden food photography backgrounds we were using so far on the blog.
This time except for 2 flat colours: mint and black, I decided to experiment with colours and textures a bit… below you can see the result.
If you are looking for more articles about blog photography I have posted about DSLR camera we are using here.

MATERIALS
- wooden / plywood boards
- acrylic paints
- Mod Podge or other decoupage sealer (glue and glaze in one)
- tissue paper, decoupage paper or paper napkins (printed layers only)
TOOLS
- sanding tool
- sandpaper (different types)
- carving tools or anything else you may use to distress the wood, for instance: screwdriver
- wide paint brushes
- sponge
- plastic palette or even better bowl for mixing colours
METHOD
1. Sand board sides, corners and surfaces to make them smooth and nice in touch. Best use for this sanding tool, if you have one on hand.
FLAT MINT & BLACK BACKDROPS

plain black wooden background: black acrylic paint

plain mint wooden background: aqua & white acrylic paint
- 2. Paint the boards and leave aside to dry for at least 15 minutes.

- 3. Paint again if the colour is not even.


DAMAGED OLD AND DIRTY WOOD

damaged wood board: sponged with black acrylic paint
- 2. Damage wood surface with metal tools you have on hand: carving tools, screwdriver etc.
- 3. Use sponge to smudge it with black paint.

- 4. Use a bit of water on the sponge to reach dents in the wood as well.
- 5. Once the paint is dry (best next day) use sandpaper to remove some of the paint and leave board looking old and dirty.


pictured: Tried & Tested & Reebok yoga mat
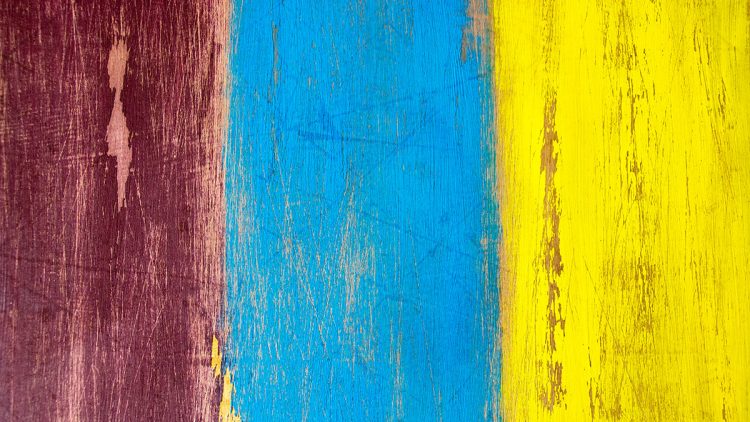
COLOURFUL RECLAIMED WOOD

reclaimed wood look: yellow, blue and maroon (mixture of pink and brown) acrylic paint
- 2. Divide board into even parts, like if it was made of wooden slats rather than one piece. I divided my board into 3 even pieces lengthwise.
- 3. Paint each part with different colour, I used blue, yellow and maroon (mixture of pink and brown paint).
- 4. Leave board to dry completely, best overnight.

- 5. Use rough sandpaper to distress the paint, especially in between where colours are connecting to give it look of separate wood pieces.

MOSSY GREEN & GREY BOARD

mossy grey board with hits of green: lime green and grey (mixture or white and black) acrylic paint
- 2. Paint board with green paint and leave aside to dry.
- 3. Paint second time, this time with grey paint skipping some spots or using dry brush to cover green paint only partially.
- 4. Once the board is completely dry (next day) sand it again to reveal some more of the green.


pictured: zebra cake recipe
DECOUPAGE BOARD

decoupage wooden board: folk pattern tissue paper glued onto the board, painted with green acrylic paint
- 2. Use Mod Podge or other decoupage sealer to stick pieces of tissue paper or colourful layer of the napkins onto the board.
- 3. Leave board aside until it is dry enough to touch.

- 4. Paint empty spaces with similar colour acrylic paint, we used green as our tissue paper was this colour.
- 5. Next day use rough sandpaper to damage the surface, scrape out some of the tissue and paint.
- 6. Then use fine sandpaper to smooth it out, until difference between paper, wood and paint parts is not that obvious.

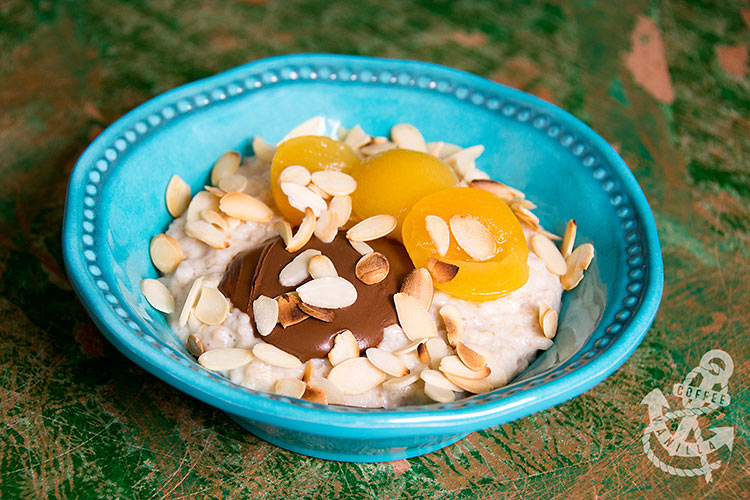
pictured: fruity porridge breakfast ideas