One of those days after talking to my children I realized that they have completely no clue how to use watercolours, they even did not like them because the colours were “not bright enough” and “watery”.
Therefore I decided we will be testing new watercolour techniques every time it is raining to convince them watercolours can give pretty results. We will be publishing our results on the blog so stay tuned.
Straw technique is one of the easiest but very fun and created this way pictures make great home décor or even gifts.
I would recommend to start with small pieces of paper, we made our pictures postcard size (quarter of the A4 / 210 x 297 mm paper pad) because tiny pictures are easier to make and can fit in small, inexpensive frames as well.

MATERIALS
- watercolours either as paint tubes or tablets
- thin low tack masking tape
- watercolour paper
- self adhesive googly eyes – optional
- paper kitchen towel

EQUIPMENT
- cardboard pieces or clipboards
- brushes (big flat ones and small pointy ones)
- cups with water
- drinking straws
- plastic mixing palettes
METHOD
First cut the paper to desired size and secure it on the cardboard or clipboard with marking tape, make sure to have less textured side of the paper up (it is better for the straw technique).

BACKGROUND / SKY
Place some paints on the mixing palette and dilute them to desired colours for the sky.
With a big brush quickly paint over entire paper, make sure not to pass the brush too many times in the same spot as it may destroy the paper and create fuzz. You can also take away some paint with squashed kitchen towel to imitate the clouds.

Let the paintings dry out completely before proceeding to the next step. Use hair dryer to help paintings dry faster in between the stages to speed up the process, if kids are getting inpatient.

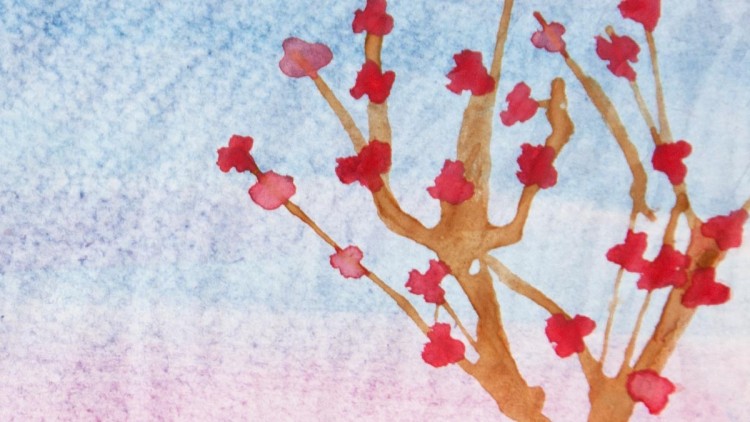
TREES
Prepare brown or other dark colour of the paint, for the trees, on the palette and dilute it to the consistence easy to blow.
Using brush place generous drop of the paint on the masking tape on the bottom of the drawing and start blowing with a straw to create the branches.
Place more paint drops where required and repeat for as many times as needed and let the tree dry out.

LEAVES / FLOWERS
With a small brush add leaves (strokes) or blossoms (tree dots close to each other) to the trees.

Let the paintings dry out.

Remove masking tape.
Once the pictures are completely dry all you have to do is to frame them and voilà!
Watercolour pictures make easy, unique DIY home décor, they are also great as gifts for friends and family for any occasion.

NOTES
If you have a while you can also paint the frames with acrylic paints, we will be doing this next…

And if you are feeling more adventurous you can also start with blank paper and make a big dot of paint in the middle and then blow to create a splodge.

Stroke paint brush with your finger nails over the paper to create the splatters. Once picture is completely dry add googly eyes to bring splodge monster to life ;)

I hope that you found this tutorial useful… and if you create something similar don’t be shy, share your images with us on Facebook, Twitter or Instagram.
Your thoughts…